Tutorial: the easiest and fastest way to set up a bilingual or multilingual blog on Google blogger
With help of this video I made my blog bilingual. If you are ready to translate your posts by yourself or are planning to write different posts in different languages, this is a good option for you. Translating my posts by myself I feel more confident about the content that I display on my blog. I copy my writing to Google Translate, copy it back and edit it so that its a proper translation and then publish it. A fast and easy way if Google Translate is accurate for your languages.
I blog in English and Dutch and want all my posts in both languages. It is an option to write them both in the same post, of course. But I find it more attractive to have two separate pages for the languages. Here is how I did it, what I think is the fastest and easiest way to do it.
There are just two steps involved. For a more attractive blog, you can do step 3 as well.
Step 1: Label your posts
Step 2: Create a page for each language
Step 3: Add links for translation (optional)
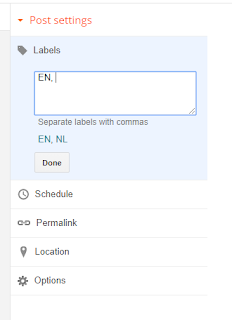
Step 1: Label your posts. You need to do this for each post. Open your post to edit. Click Labels (on the right) and create a label indicating the language. Anything can do, just be consistent (with small and capital letters as well). I used EN for English and NL for Dutch.
Save the changes. You can now get all posts of the same language by adding /search/label/EN to your web address. Make sure to write exactly the name of the label that you marked your posts with after the last / (my label is in red).
So I now have mylifeasnepaliwife.blogspot.com/search/label/EN and mylifeasnepaliwife.blogspot.com/search/label/NL

Step 2: Create a page for each language Go to Layout (on the left), click on the edit icon of the Pages gadget (in Page list). It will open this window:

Now, click + Add external link
This will add pages that redirect to another page (can be any other site on the net as well).

Now create pages for each language one by one. You are free to name them as you like. I preferred the short forms as I feel that it matches with the design of my blog. Let the pages redirect to the page with the selection of posts in that language. Save each link. You can order the pages in the order you prefer.

Now my Home page shows posts in both languages. If you click EN, you will get the posts in English, if you click NL, you get them in Dutch.
OPTIONAL:
Step 3: Add links for translation. I decided to include a hyperlink at the end of each post that redirects to the translation of that post in the other language. It's simple. Just write some text like: Click for English (in a Dutch post), find the link to the English post, copy that and add it as a Link: Select your text, click Link in the editor bar, and paste the link there. People can now easily get translation if they found that the post they are watching at is in a language they don't understand.
You can now write your post in both languages at the same time, in different tabs. And add links to the translation by copying the link given under Permalink (on the right side, under Labels).
Enjoy blogging!


Comments
Post a Comment